
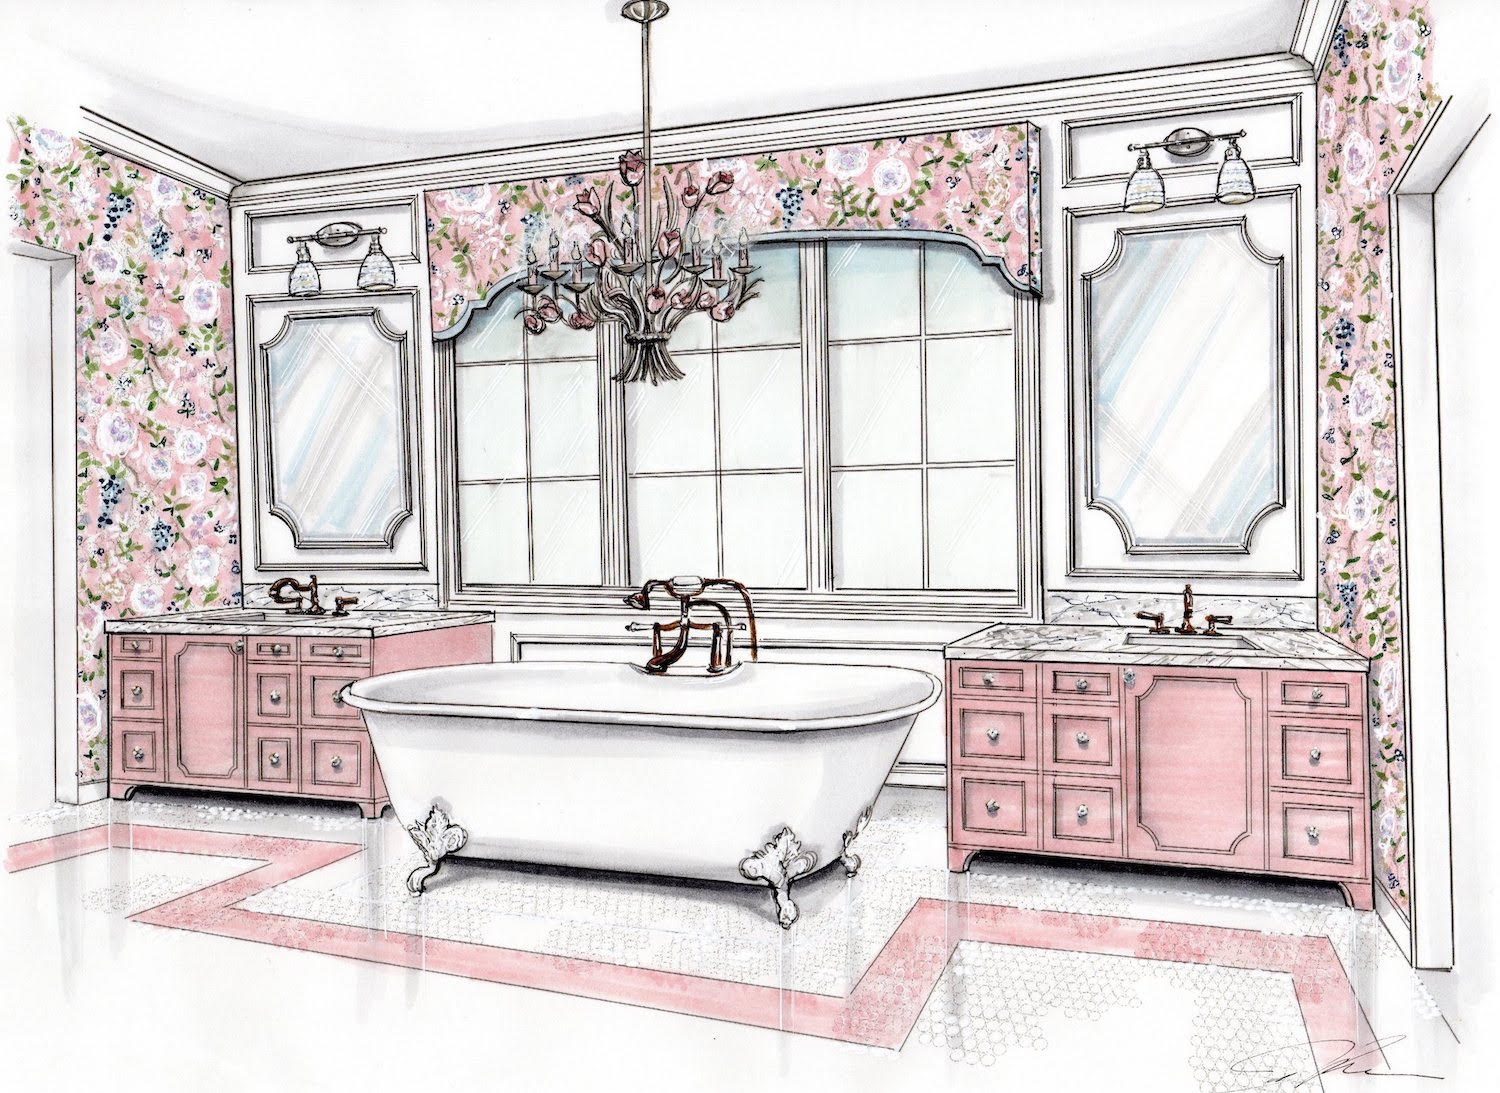
I’m so excited to share this sneak peek of Sloane’s Bathroom Design Concept! It has taken so much work to bring this bathroom to life (on paper)! Seeing this gorgeous hand-drawn rendering is such a treat, and makes me so happy! It was done by the very talented Jane Gianarelli. I sent Jane all the design selections and CAD drawings, and then she so accurately and beautifully drew it up for me! I wish I could draw like this! She is a true artist. She drew up our front elevation here, and I will be working with Jane on some more areas too! But for now, more about a girl’s bathroom in the making:
Conceptualizing:
When designing the layout of our home, I knew that I wanted a spacious and glamorous bathroom for Sloane to grow up in. Many of the new homes that are built now, build secondary bedrooms with their own smaller ensuite or a Jack and Jill bathroom. This has become quite common in our area. I wanted something unique and truly custom when it came to Sloane’s bathroom – outside of the norm. Instead of two smaller bathrooms, I wanted to create one large bathroom that could be shared. Sloane is an only child, but if we were to have another daughter, I designed the upstairs of the home to have two identical bedrooms that both access the shared bath. I wanted “the girl’s” bathroom to feel more like a second owner’s bath than a secondary bathroom. In our case, we included two vanities, one shower, one free standing tub and one water closet. If you think about it, although we are using a tad more square footage than the two smaller baths, we did not have to purchase two toilets nor tile two separate showers. We only needed fixtures for one bathroom, and were able to make it larger and more luxurious. I also like that a shared space forces siblings to share and bond in a space together, and gives them more room and a fun place to get ready in! My prediction is that larger children’s shared baths are going to become more popular again for those reasons. Here’s the original concept board I created:

Drawing up the Design:
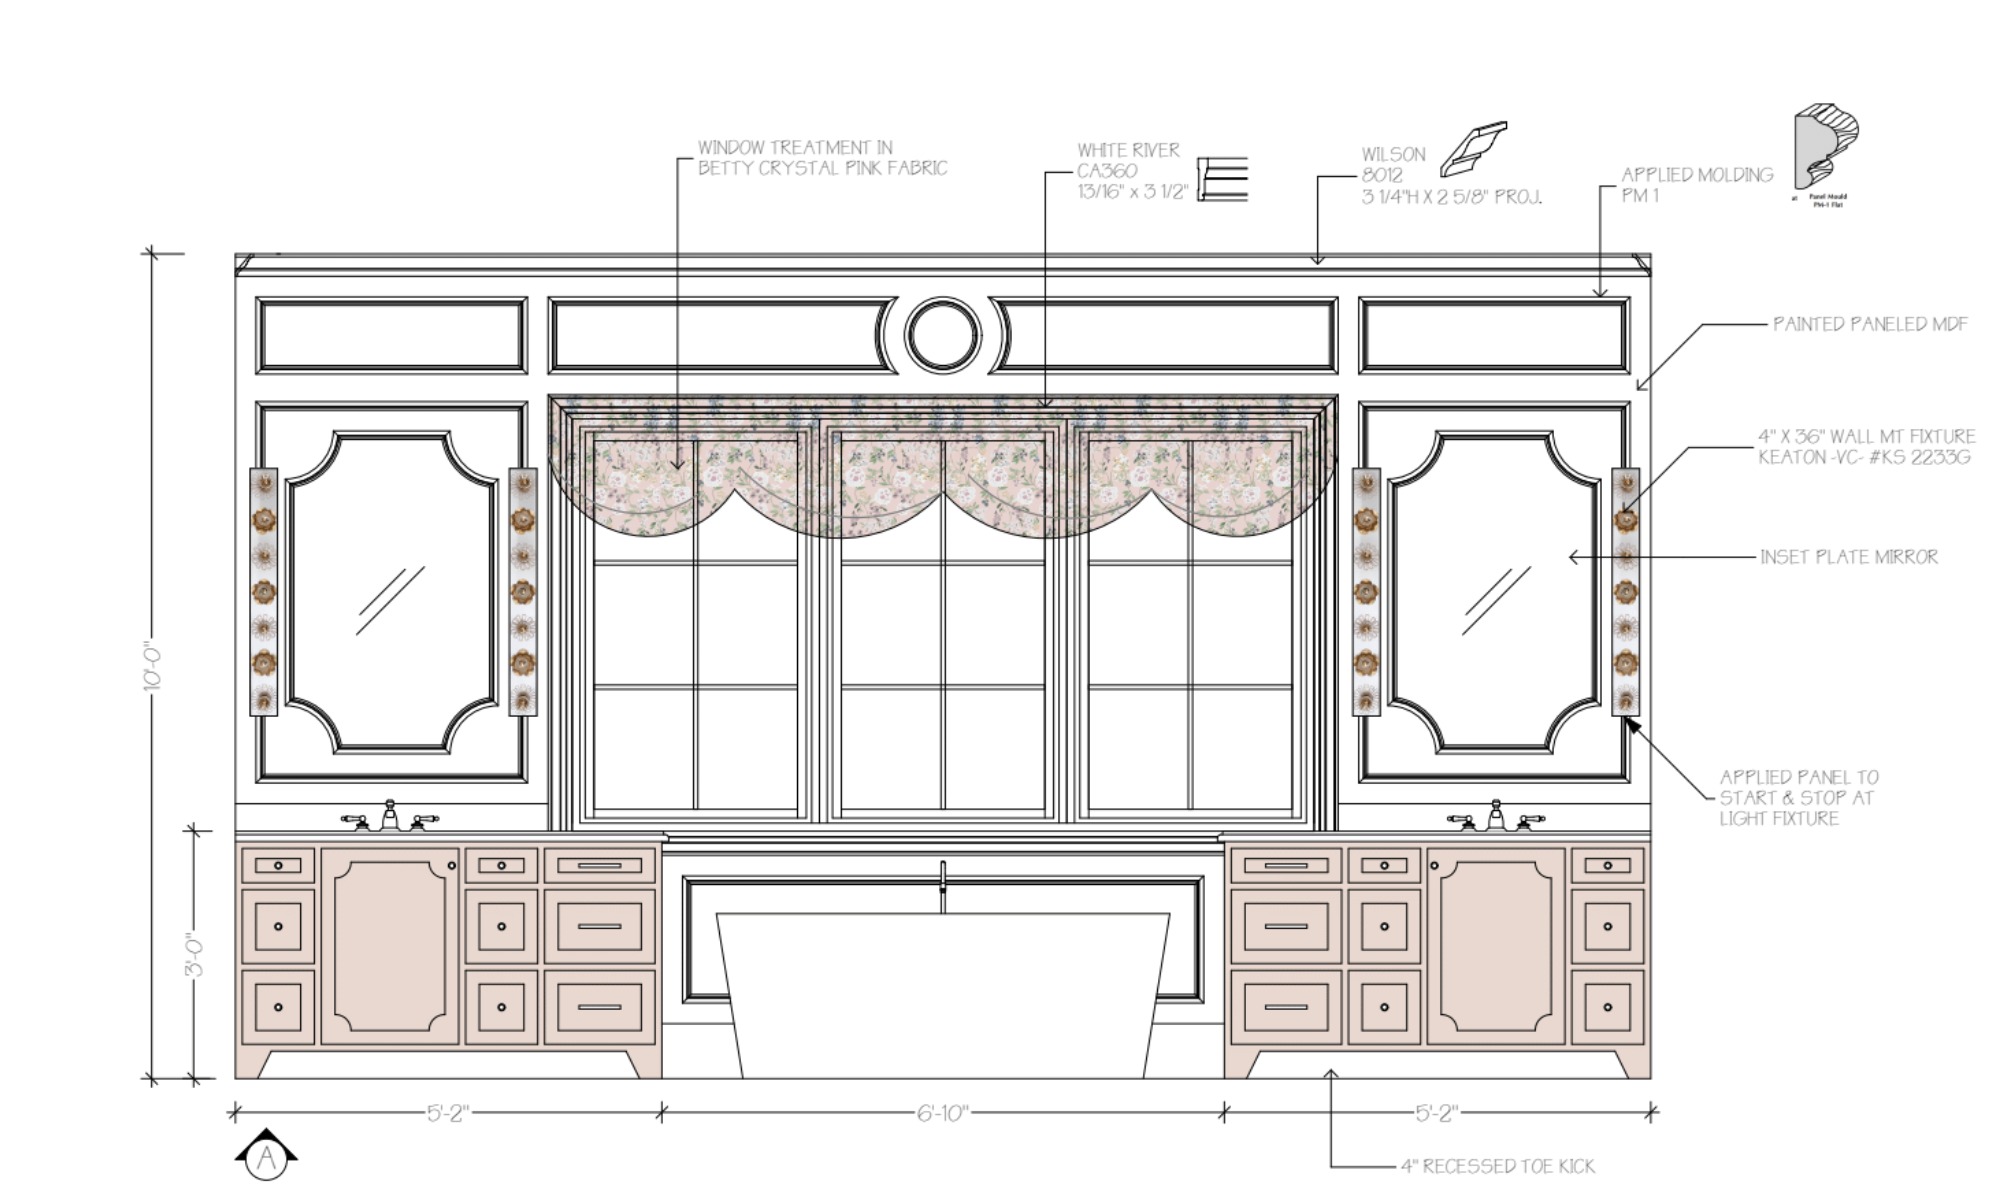
Ok so back to the design…The flow and location of this space was something that had to be thought about as we created the floor plan of the home, and we needed to work within the constraints of the front elevation. From the beginning, I had a very specific vision of how I wanted our upstairs to be laid out, and also a very specific and symmetrical front exterior. The windows needed to line up. Therefore, The large window that is front and center on our home was the perfect spot for Sloane’s bath, placed between the two bedrooms. During the architectural phase, we were excited that she would have this oversized, dreamy window in her bathroom, but once we started designing the interior architecture, it posed some issues! I worked with Christina Garcia of Layered Dimensions to help us design all the interior architecture, cabinetry and trim throughout our home. Her guidance and CAD drawings have been crucial to the success of our project. She drew up the elevation of the bathroom, and designed the paneling feature to tie together the vanities and make the large window work in the space. What you don’t see in the hand drawn rendering is the beautiful sit-down vanity space on the opposite side of the bathroom. It will also function as towel and beauty product storage. You will get a better glimpse of this in the final reveal! Christina also came up with the idea to do a border on the floor tile. We toyed around with different tile inlay ideas, and I finally landed on a classic white penny tile with the blush pink penny tile border accent. The pink penny tile will also be used in the shower (which is getting done now, and more surprises to come!) I will just add that working with a talented designer that can bring your vision to life is such a blessing. It’s one thing to know what you want and see pictures of it, but executing it to fit within the exact dimensions of your space and having a CAD drawing with specifications that can be shared with tile installers, carpenters, electricians and other tradesmen so that everyone knows exactly what to do is invaluable. As a self-taught designer, I can visualize what I want in a space and verbalize it, but actually drawing it up and having it in CAD takes a true professional. I will probably do a whole other post on why and how we worked with Christina on our home!
 Paint colors and Wallpaper:
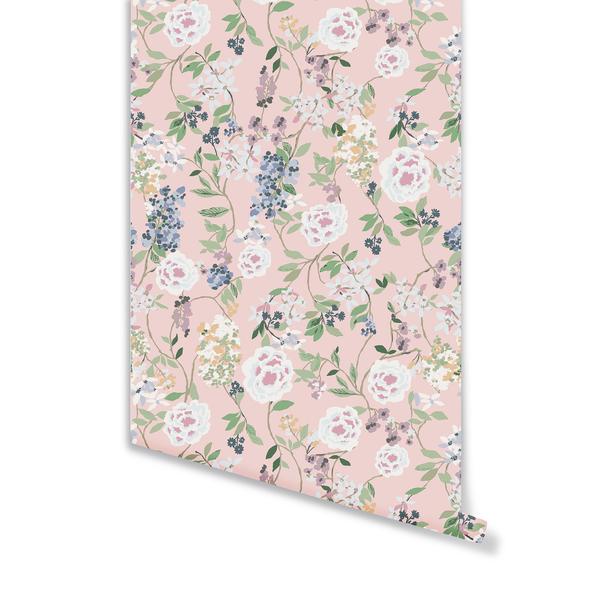
I knew that I wanted pink vanities, and the color BM East Lake Rose went perfectly with the wallpaper I chose. I fell in love with this wallpaper early on in the design of the home. It was one of the first things I picked out for the entire house, and I loved that it came in a fabric also. I plan to use the fabric as pillows in Sloane’s bedroom. The wallpaper has lots of other colors in it, and I like that I can accent it with blue. Because we have been building for so long, I have changed my mind on the direction of certain things throughout, but this wallpaper is something that I still love, so that’s a good sign! Oh, and Sloane loves it too!
Plumbing Fixtures:
I was inspired by a picture I saw in a bathroom where antique copper tub fixtures were used, and I decided that I wanted Sloane’s bathroom fixtures to be as unique as her bathroom. I wanted it to feel like something from an old Parisian apartment. Regular copper is too shiny and will patina, and rubbed bronze was not the look I was going for – so I fell in love with the antique copper color. I also broke all the rules because I am mixing metals in here not just in the lighting and cabinet hardware, but in the plumbing fixtures. I am going to use a polished nickel metal on light fixtures and cabinet hardware and the shower faucets will also be the polished nickel. The antique copper with marble handles will be featured just on the vanities and tub. I didn’t want the darker color hardware in the shower against the pink tile so I mixed it up! I wanted an elegant clawfoot tub, but I chose white porcelain claw feet (instead of silver) so that they would not clash with the other fixtures in the space. I also wanted a floor mounted old-fashioned tub filler in the antique copper color. I was so happy to find a faucet line that had so many finishes to choose from and coordinated them with the bath tub and shower fixtures. A company that carried both antique copper faucets and a tub filler was HARD to find! My friend, Nicole Taylor, at Pierce Hardware helped me select unique fixtures for our entire home. Y’all, don’t overlook your plumbing fixtures and faucets. It’s a great way to infuse a designer touch and character into your home.

Lighting:
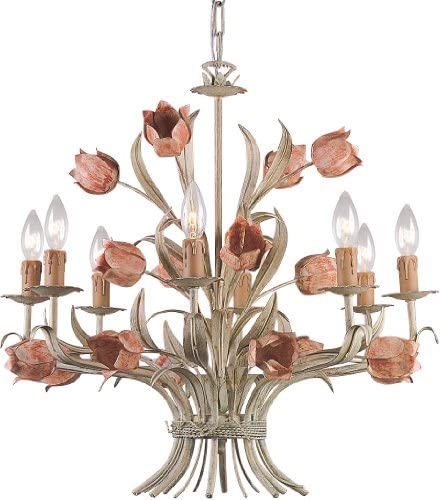
This chandelier was in Sloane’s nursery when I brought her home from the hospital. I purchased this light for her before she was born, and it has come along with us in each of the homes we have lived in. It was the perfect chandelier to be used in her bathroom to tie in with the floral wallpaper, and it has that antique vibe that works well with the other fixtures. I love that it’s a sentimental piece and it will be hung front and center over the tub. The vanity lights were a great find, and the vintage style hobnail glass was the perfect touch. We were originally going to do sconces on the sides of the mirrors, but I switched it up, and I’m so in love with them.
I really enjoyed coming up with all the perfect elements in the bathroom I wish I had when I was little girl! Or even now 😉 It has been so fun designing such a girly, yet sophisticated space that she can grow with. I will be sharing a final reveal of the space when it’s all done, with a full list of all of our sources at that time. Stay tuned!


Leave a Reply